
How to Use HubSpot: A Comprehensive Guide for Marketers
HubSpot is an all-in-one inbound marketing and sales platform designed to help businesses grow. From lead generation to sales and customer service, HubSpot provides tools to help businesses attract, engage and delight customers. In this comprehensive guide, we’ll cover everything you need to know to get started with HubSpot and make the most of its features.
Step 1: Set Up Your HubSpot Account
The first step to using HubSpot is setting up your account. To create an account, go to the HubSpot website and click the “Get Started” button. From there, you’ll be prompted to enter your email address, company name, and website URL. Once you’ve entered your information, you’ll be asked a few questions about your business, including your industry, company size, and marketing goals.
Once you’ve completed the initial setup, you’ll be taken to the HubSpot dashboard. This is where you’ll manage all of your marketing, sales, and service activities.

Step 2: Get to Know the HubSpot Dashboard
The HubSpot dashboard is the central hub for all of your marketing, sales, and service activities. Here’s a breakdown of the main sections of the dashboard:
Marketing: This section is where you’ll manage your marketing activities, including your website, landing pages, blog, social media, email campaigns, and analytics.
Sales: This section is where you’ll manage your sales activities, including your pipeline, deals, contacts, and tasks.
Service: This section is where you’ll manage your customer service activities, including your ticket queue, knowledge base, and customer feedback.
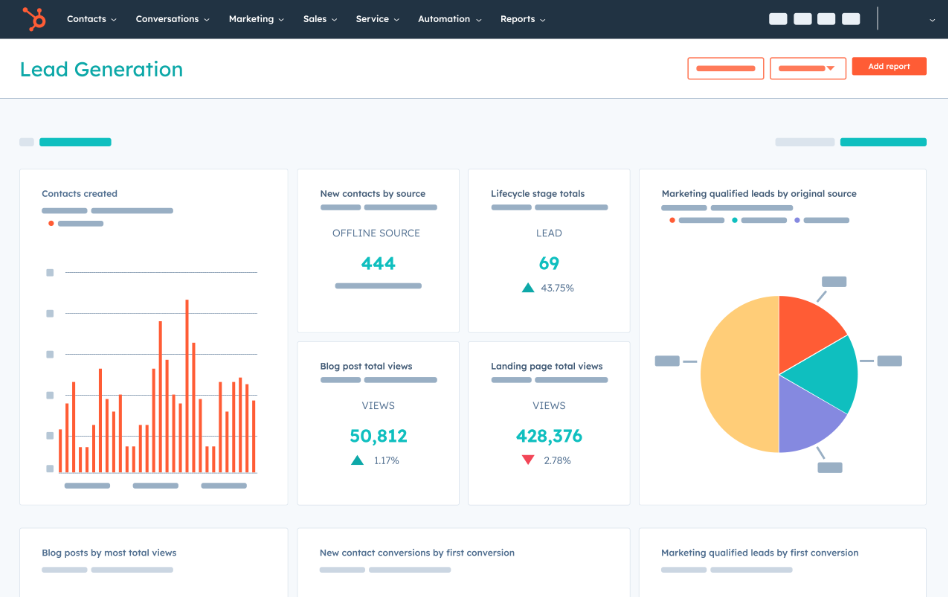
Reports: This section is where you’ll access analytics and reports for all of your marketing, sales, and service activities.
Step 3: Set Up Your Marketing Activities
HubSpot offers a range of marketing tools to help you attract, engage, and convert customers. Here’s a breakdown of some of the key marketing tools and how to set them up:
Website: HubSpot allows you to create and manage your website from within the platform. To set up your website, go to the “Marketing” section of the dashboard and click “Website.” From there, you’ll be prompted to choose a template or start from scratch. You can then customize your website by adding pages, forms, and CTAs.
Landing Pages: HubSpot’s landing pages are designed to convert visitors into leads. To set up a landing page, go to the “Marketing” section of the dashboard and click “Landing Pages.” From there, you can choose a template or create a new page from scratch. You can then customize your landing page by adding form fields, images, and copy.
Blog: HubSpot’s blogging tool allows you to create and publish blog posts that are optimized for search engines. To set up your blog, go to the “Marketing” section of the dashboard and click “Blog.” From there, you can create new posts, customize your blog design, and manage comments.
Social Media: HubSpot’s social media tool allows you to schedule and publish posts on social media platforms like Facebook, Twitter, and LinkedIn. To set up your social media accounts, go to the “Marketing” section of the dashboard and click “Social.” From there, you can connect your social media accounts and schedule posts.
Email: HubSpot’s email tool allows you to create and send targeted email campaigns to your subscribers. To set up your email campaigns, go to the “Marketing” section of the dashboard and click “Email.” From there, you can create new email templates, set up email workflows, and send emails to your subscribers.

Step 4: Set Up Your Sales Activities
HubSpot’s sales tools are designed to help you manage your sales pipeline, close deals, and grow your business. Here’s a breakdown of some of the key sales tools and how to set them up:
Pipeline: HubSpot’s pipeline tool allows you to manage your sales process and track deals from initial contact to close. To set up your pipeline, go to the “Sales” section of the dashboard and click “Deals.” From there, you can create custom deal stages, set up deal pipelines, and manage your deals.
Contacts: HubSpot’s contacts tool allows you to manage your contacts and track their interactions with your business. To set up your contacts, go to the “Sales” section of the dashboard and click “Contacts.” From there, you can import your existing contacts, create custom contact properties, and manage your contact lists.
Tasks: HubSpot’s tasks tool allows you to manage your to-do list and stay on top of your sales activities. To set up your tasks, go to the “Sales” section of the dashboard and click “Tasks.” From there, you can create tasks, set due dates, and assign tasks to specific team members.
Meetings: HubSpot’s meetings tool allows you to schedule meetings with leads and customers directly from your calendar. To set up your meetings, go to the “Sales” section of the dashboard and click “Meetings.” From there, you can customize your meeting settings, set up meeting types, and share your availability.
Step 5: Set Up Your Customer Service Activities
HubSpot’s customer service tools are designed to help you provide exceptional customer support and build long-term customer relationships. Here’s a breakdown of some of the key customer service tools and how to set them up:
Ticket Queue: HubSpot’s ticket queue tool allows you to manage customer support requests from one centralized location. To set up your ticket queue, go to the “Service” section of the dashboard and click “Tickets.” From there, you can create custom ticket statuses, set up ticket pipelines, and manage your tickets.
Knowledge Base: HubSpot’s knowledge base tool allows you to create a library of articles and resources to help your customers solve common problems. To set up your knowledge base, go to the “Service” section of the dashboard and click “Knowledge Base.” From there, you can create new articles, organize your knowledge base, and track article performance.
Customer Feedback: HubSpot’s customer feedback tool allows you to collect feedback from your customers and use it to improve your products and services. To set up your customer feedback, go to the “Service” section of the dashboard and click “Feedback.” From there, you can create custom feedback surveys, set up feedback workflows, and analyze your feedback data.

Step 6: Analyze Your Results
One of the biggest benefits of using HubSpot is the ability to track and analyze your marketing, sales, and service activities in one place. HubSpot provides a range of analytics tools to help you measure your results and optimize your campaigns. Here’s a breakdown of some of the key analytics tools and how to use them:
Marketing Analytics: HubSpot’s marketing analytics tool allows you to track website traffic, leads, and conversion rates. To access your marketing analytics, go to the “Reports” section of the dashboard and click “Analytics.” From there, you can view your website analytics, landing page analytics, blog analytics, and social media analytics.
Sales Analytics: HubSpot’s sales analytics tool allows you to track your sales pipeline, deals, and revenue. To access your sales analytics, go to the “Reports” section of the dashboard and click “Sales Analytics.”